Learn how to expose LoadBalanced Kubernetes Services with Cilium, with practical steps for secure, scalable service networking on cloud and on-prem clusters.
Discover the benefits of Cilium's BGP integration, which ensures efficient networking and strong security without additional components.
Load balancing for Kubernetes Services with BGP and Cilium
Cilium is an open-source project that provides networking, security, and observability for cloud-native environments, such as Kubernetes clusters and other container orchestration platforms. In this blog, we show you how to make a Kubernetes Service available to the outside world using Cilium and BGP.
Need help with Cilium or Kubernetes?
Ask one of our experts your question about Cilium, networking, Kubernetes, clusters, or setups. We are ready to help you!
BGP
Border Gateway Protocol (BGP) is a standardized exterior gateway protocol designed for exchanging routing and reachability information between autonomous systems (ASes) on the internet. The protocol is classified as a path vector protocol and makes routing decisions based on paths, network policies, or rule sets configured by a network administrator. Because BGP plays a central role in core routing decisions, it is crucial to the functioning of the Internet.
BGP was developed with robustness and scalability in mind and is used to route data traffic between large networks, such as Internet service providers (ISPs) and other large organizations. It ensures loop-free inter-domain routing and helps maintain a stable network structure. BGP can handle thousands of routes and is distinguished by its ability to scale with the growth of the network. Thanks to its flexibility and extensive control over routing policies, it is widely used and can respond quickly to changes in the network.
Cilium and BGP
In release 1.10, Cilium has integrated BGP support via MetalLB. This allows Cilium to announce Kubernetes Service IP addresses of the LoadBalancer type via BGP. The result is that services are accessible from outside the Kubernetes network without additional components such as an Ingress Router. The fact that no additional components are required is particularly good news, as each additional component adds latency — so fewer components means less latency.
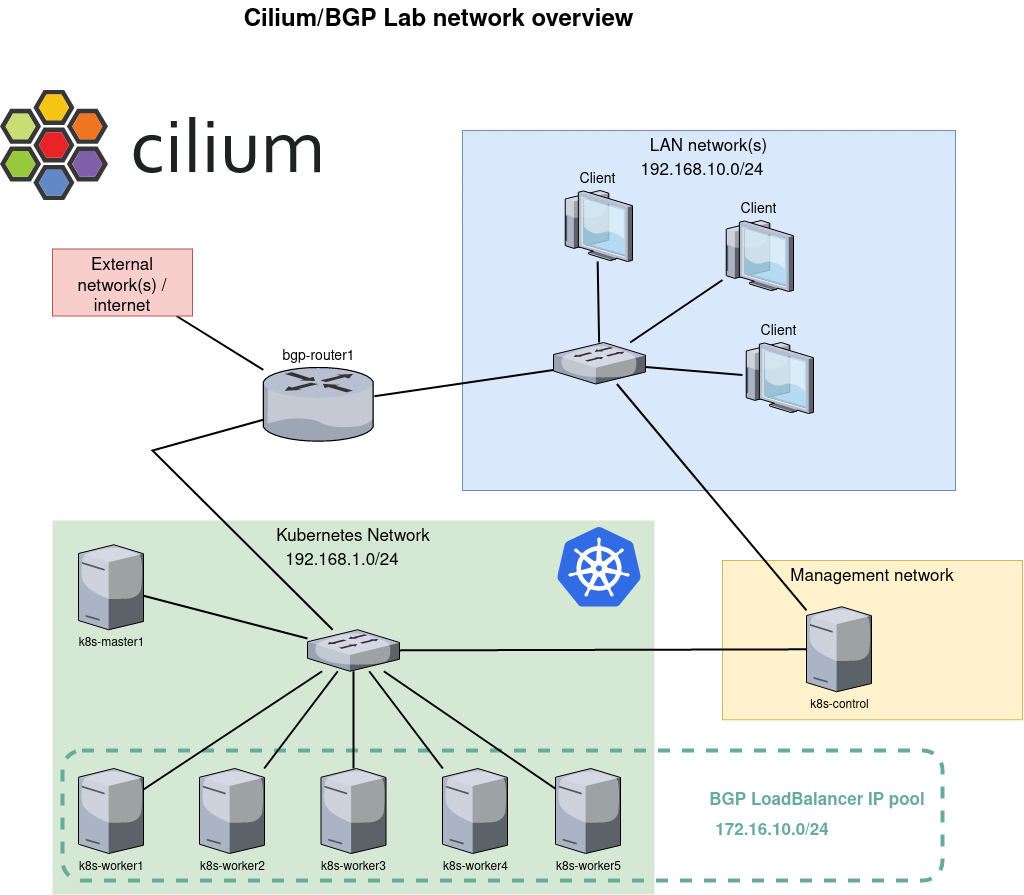
The network configuration shown in this example describes a Kubernetes environment with BGP integration for service load balancing. Below is an overview of the configuration:
Client Network (LAN network(s))
There is a local area network (LAN) with the IP range 192.168.10.0/24 to which multiple clients are connected. This network forms the user side of the setup, where users and other devices access services running on the Kubernetes cluster.
Kubernetes Network
The Kubernetes cluster has its own network space, designated as subnet 192.168.1.0/24. This network contains the Kubernetes master node (k8s-master1) and multiple worker nodes (k8s-worker1 through k8s-worker5). The containers and workloads of the Kubernetes cluster run on these nodes.
Management Network
There is a separate management network, with at least one device (k8s-control) for managing and controlling the Kubernetes cluster. This network is separate from the Kubernetes dataplane, which contributes to better security and more efficient management.
BGP Router
The bgp-router1 forms the bridge between the external network/Internet connection and the Kubernetes network. This router is responsible for routing traffic to the correct services within the Kubernetes cluster by announcing routes via BGP. The IP range 172.16.10.0/24 is reserved for LoadBalancer services within the Kubernetes cluster. When a Kubernetes Service is exposed as a LoadBalancer, it is assigned an IP address from this pool. The BGP router then announces this IP address to the external network, ensuring that traffic is correctly routed to the LoadBalancer service.
This network configuration enables scalable and flexible load balancing for services running on a Kubernetes cluster by using BGP for IP address management and routing. Separating client access, cluster management, and service traffic into different networks creates a clear and secure architecture.
Exposing a service
Once the above infrastructure has been built, it is time to create a deployment and expose it to the network via BGP. We start with a deployment with a simple NGINX web server that serves the default web page. We also add a Service with type LoadBalancer. This results in an external IP address that is announced to our router via BGP.
Once everything is running, let the command kubectl get svc see that our service has an external IP address:
NAME         TYPE         CLUSTER-IP       EXTERNAL-IP    PORT(S)        AGE
kubernetes   ClusterIP    10.96.0.1        <none>         443/TCP        7d3h
web1-lb      LoadBalancer 10.106.236.120   172.16.10.0    80:30256/TCP   7d2h
Copy code
The address 172.16.10.0 may look strange, but that's fine. Often, the .0 address is skipped and .1 is used as the first address. One of the reasons for this is that in the early days, the .0 address was used for broadcast, which later changed to .255. Because .0 is still a valid address, MetalLB, which is responsible for the address pool, simply assigns it as the first address. The command vtysh -c 'show bgp summary' on router bgp-router1 shows that it has received one prefix:
IPv4 Unicast Summary:
BGP router identifier 192.168.1.1, local AS number 64512 vrf-id 0
BGP table version 17
RIB entries 1, using 192 bytes of memory
Peers 6, using 128 KiB of memoryNeighbour V AS MsgRcvd MsgSent TblVer InQ OutQ Up/Down State/PfxRcd PfxSnt
192.168.1.10 4 64512 445 435 0 0 0 03:36:56 1 0
192.168.1.21 4 64512 446 435 0 0 0 03:36:54 1 0
192.168.1.22 4 64512 445 435 0 0 0 03:36:56 1 0
192.168.1.23 4 64512 445 435 0 0 0 03:36:56 1 0
192.168.1.24 4 64512 446 435 0 0 0 03:36:56 1 0

192.168.1.25 4 64512 445 435 0 0 0 03:36:56 1 0

Total number of neighbors 6
Copy code
The following excerpt from the routing table (ip route) shows us that there are six possible routes/destinations for that specific IP address 172.16.10.0. In other words: all Kubernetes nodes have announced that they handle traffic for that address. Cool!!
172.16.10.0 proto bgp metric 20

nexthop via 192.168.1.10 dev enp7s0 weight 1
nexthop via 192.168.1.21 dev enp7s0 weight 1
nexthop via 192.168.1.22 dev enp7s0 weight 1
nexthop via 192.168.1.23 dev enp7s0 weight 1
nexthop via 192.168.1.24 dev enp7s0 weight 1
nexthop via 192.168.1.25 dev enp7s0 weight 1
Copy code
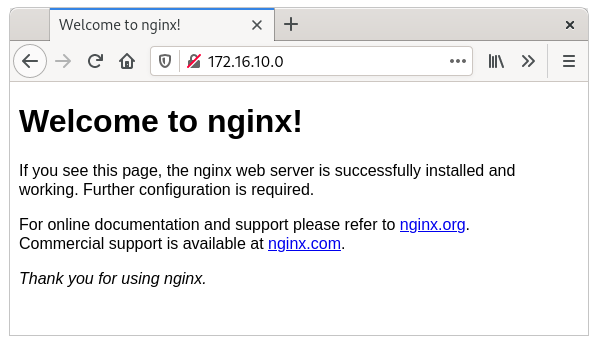
Indeed: the webpage is now visible from our router.
$ curl -s -v http://172.16.10.0/ -o /dev/null

* Trying 172.16.10.0…
* TCP_NODELAY set
* Connected to 172.16.10.0 (172.16.10.0) port 80 (#0)
> GET / HTTP/1.1
> Host: 172.16.10.0
> User-Agent: curl/7.61.1
> Accept: */*>
< HTTP/1.1 200 OK
< Server: nginx/1.21.3
< Date: Sun, 31 Oct 2023 14:19:17 GMT
< Content-Type: text/html
< Content-Length: 615
< Last-Modified: Tue, 07 Sep 2023 15:21:03 GMT
< Connection: keep-alive
< ETag: “6137835f-267”
< Accept-Ranges: bytes>

{ [615 bytes data]}

* Connection #0 to host 172.16.10.0 left intact
Copy code
And a client in our client network can also reach that same page, because it uses bgp-router1 as its default route.
More details
Now that everything is working, most engineers would like to see more details—and I won't keep those from you.
Ping
One of the first things you notice is that the LoadBalancer IP address cannot be reached via ping. If you look into this further, it becomes clear why. We have created a mapping between source port 80 and destination port 80. This mapping is performed with eBPF logic on the interface and is present on all nodes. This mapping ensures that only traffic for port 80 is load balanced. All other traffic, including ping, is not picked up. That is why you see that the ICMP packet reaches the node, but no response is ever sent.
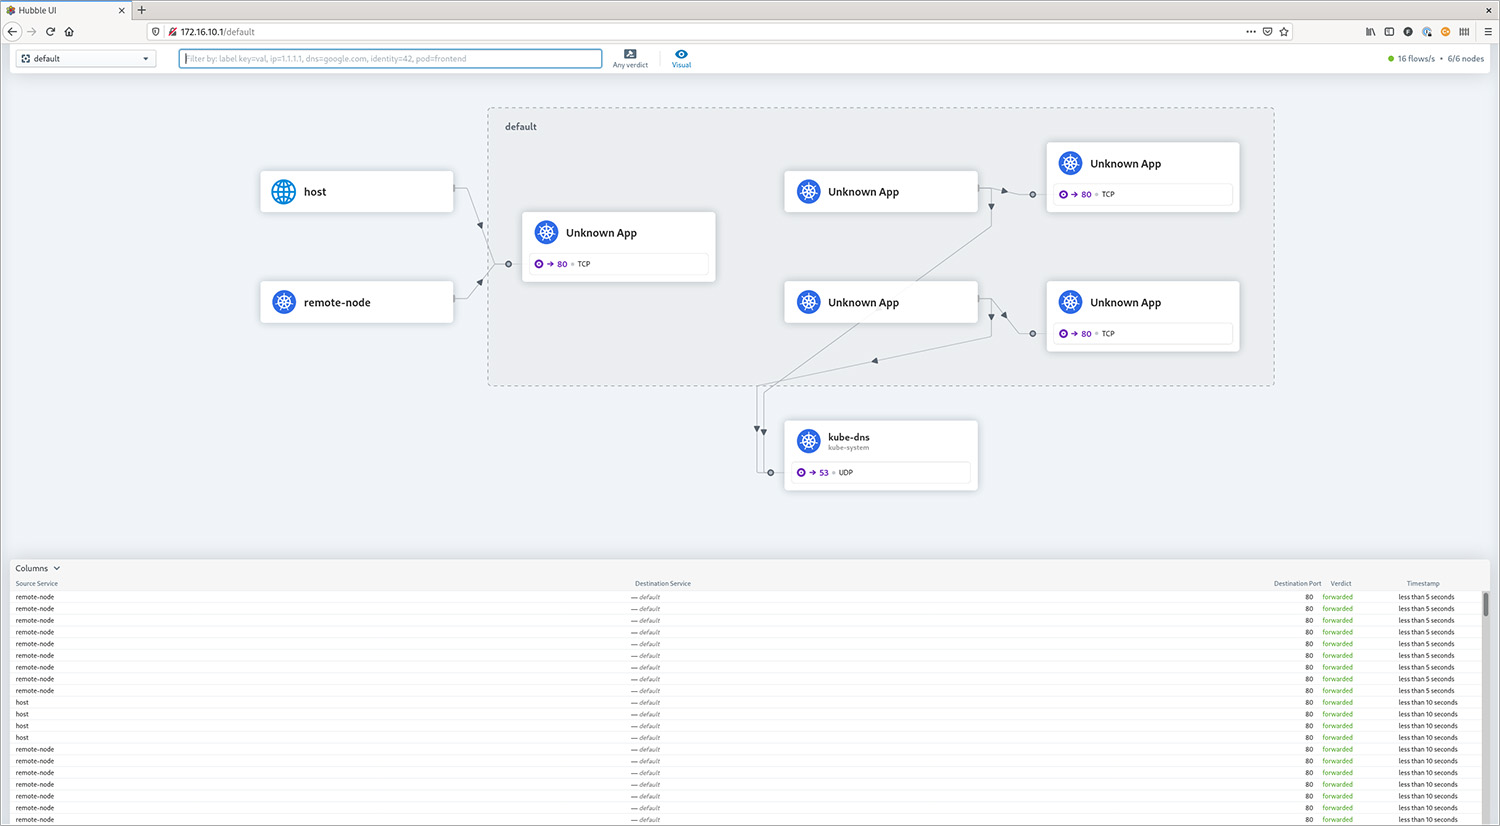
Observing traffic
Hubble is the networking and security observability platform built on top of eBPF and Cilium. Both the command line and a graphical web GUI can be used to view current and historical traffic. In this example, Hubble is located on the k8s-control node, which has direct access to the API of Hubble RelayHubble Relay is the component that retrieves the necessary information from the Cilium nodes. Please note: the hubbleThe command is also available in every Cilium agent pod, but it only displays information from that specific agent.
The output below shows the observation that results from executing curl http://172.16.10.0/ on the router.
$ hubble observe --namespace default --follow

Oct 31 15:43:41.382: 192.168.1.1:36946 <> default/web1-696bfbbbc4-jnxbc:80 to-overlay FORWARDED (TCP Flags: SYN)
Oct 31 15:43:41.384: 192.168.1.1:36946 <> default/web1-696bfbbbc4-jnxbc:80 to-overlay FORWARDED (TCP Flags: ACK)
Oct 31 15:43:41.384: 192.168.1.1:36946 <> default/web1-696bfbbbc4-jnxbc:80 to-overlay FORWARDED (TCP Flags: ACK, PSH)
Oct 31 15:43:41.385: 192.168.1.1:36946 <> default/web1-696bfbbbc4-jnxbc:80 to-overlay FORWARDED (TCP Flags: ACK)
Oct 31 15:43:41.385: 192.168.1.1:36946 <> default/web1-696bfbbbc4-jnxbc:80 to-overlay FORWARDED (TCP Flags: ACK)
Oct 31 15:43:41.386: 192.168.1.1:36946 <> default/web1-696bfbbbc4-jnxbc:80 to-overlay FORWARDED (TCP Flags: ACK, FIN)
Oct 31 15:43:41.386: 192.168.1.1:36946 <> default/web1-696bfbbbc4-jnxbc:80 to-overlay FORWARDED (TCP Flags: ACK)
Copy code
Earlier, I warned against using the hubble command within the Cilium agent pod, but it can also be very valuable to view the traffic per specific node. In this case, hubble observe –namespace default –follow is executed within each Cilium agent pod, while the curl is executed once from the router.
On the node where the pod is actually running (k8s-worker2), we see the same output as above. However, on another node (k8s-worker1), we see the following:
Oct 31 15:56:05.220: 10.0.3.103:48278 -> default/web1-696bfbbbc4-jnxbc:80 to-endpoint FORWARDED (TCP Flags: SYN)
Oct 31 15:56:05.220: 10.0.3.103:48278 <- default/web1-696bfbbbc4-jnxbc:80 to-stack FORWARDED (TCP Flags: SYN, ACK)
Oct 31 15:56:05.220: 10.0.3.103:48278 -> default/web1-696bfbbbc4-jnxbc:80 to-endpoint FORWARDED (TCP Flags: ACK)
Oct 31 15:56:05.221: 10.0.3.103:48278 -> default/web1-696bfbbbc4-jnxbc:80 to-endpoint FORWARDED (TCP Flags: ACK, PSH)
Oct 31 15:56:05.221: 10.0.3.103:48278 <- default/web1-696bfbbbc4-jnxbc:80 to-stack FORWARDED (TCP Flags: ACK, PSH)
Oct 31 15:56:05.222: 10.0.3.103:48278 -> default/web1-696bfbbbc4-jnxbc:80 to-endpoint FORWARDED (TCP Flags: ACK, FIN)
Oct 31 15:56:05.222: 10.0.3.103:48278 <- default/web1-696bfbbbc4-jnxbc:80 to-stack FORWARDED (TCP Flags: ACK, FIN)
Oct 31 15:56:05.222: 10.0.3.103:48278 -> default/web1-696bfbbbc4-jnxbc:80 to-endpoint FORWARDED (TCP Flags: ACK)
Oct 31 15:56:12.739: 10.0.4.105:36956 -> default/web1-696bfbbbc4-jnxbc:80 to-endpoint FORWARDED (TCP Flags: SYN)
Oct 31 15:56:12.739: default/web1-696bfbbbc4-jnxbc:80 <> 10.0.4.105:36956 to-overlay FORWARDED (TCP Flags: SYN, ACK)
Oct 31 15:56:12.742: 10.0.4.105:36956 -> default/web1-696bfbbbc4-jnxbc:80 to-endpoint FORWARDED (TCP Flags: ACK)
Oct 31 15:56:12.742: 10.0.4.105:36956 -> default/web1-696bfbbbc4-jnxbc:80 to-endpoint FORWARDED (TCP Flags: ACK, PSH)
Oct 31 15:56:12.745: default/web1-696bfbbbc4-jnxbc:80 <> 10.0.4.105:36956 to-overlay FORWARDED (TCP Flags: ACK, PSH)
Oct 31 15:56:12.749: 10.0.4.105:36956 -> default/web1-696bfbbbc4-jnxbc:80 to-endpoint FORWARDED (TCP Flags: ACK, FIN)
Oct 31 15:56:12.749: default/web1-696bfbbbc4-jnxbc:80 <> 10.0.4.105:36956 to-overlay FORWARDED (TCP Flags: ACK, FIN)
Copy code
What we see here is that our router sends traffic for IP address 172.16.10.0 to k8s-worker1, but that worker does not host the web1 container. Therefore, the traffic is forwarded to k8s-worker2, which actually handles the traffic. All forwarding logic is handled with eBPF — a small BPF program attached to the interface that forwards traffic to another worker if necessary. That is also why running tcpdump on k8s-worker1, where the packets initially arrive, shows no traffic. The traffic is already redirected to k8s-worker2 before it reaches the IP stack of k8s-worker1.
Cilium.io also offers extensive information about eBPF and its internal workings. If you are not yet familiar with eBPF and you are interested in Linux and/or networking, do yourself a favor and learn at least the basics. In my humble opinion, eBPF networking in Linux is going to change dramatically in the near future—especially in cloud-native environments.
Hubble Web GUI
With a working BGP setup, it is also fairly easy to make the Hubble Web GUI available to the outside world.
Finally
Thanks to the integration of MetalLB, setting up Cilium with BGP is remarkably simple, without the need for expensive network hardware. This combination of Cilium/BGP, especially when combined with disabling kube-proxy, significantly reduces latency to your cloud-based services. It also improves security and transparency, as only the IP addresses of LoadBalancer services are announced.
Although this setup does not require an Ingress Controller, one is still recommended for most HTTP Services. Controllers such as NGINX or Traefik, exposed via BGP, offer significant advantages at the protocol level, such as URL rewriting and request rate limiting.
This progress in cloud-native and Linux-based networking is truly a major step forward and marks a particularly exciting phase in the evolution of network technology.
- Learn how to expose LoadBalanced Kubernetes Services with Cilium, with practical steps for secure, scalable service networking on cloud and on-prem clusters.
- Load balancing for Kubernetes Services with BGP and Cilium
- Need help with Cilium or Kubernetes?
- BGP
- Cilium and BGP
- Exposing a service
- More details
- Hubble Web GUI
- Finally